


 Tráducido
al Portugues por Neusa Novaes
Tráducido
al Portugues por Neusa Novaes


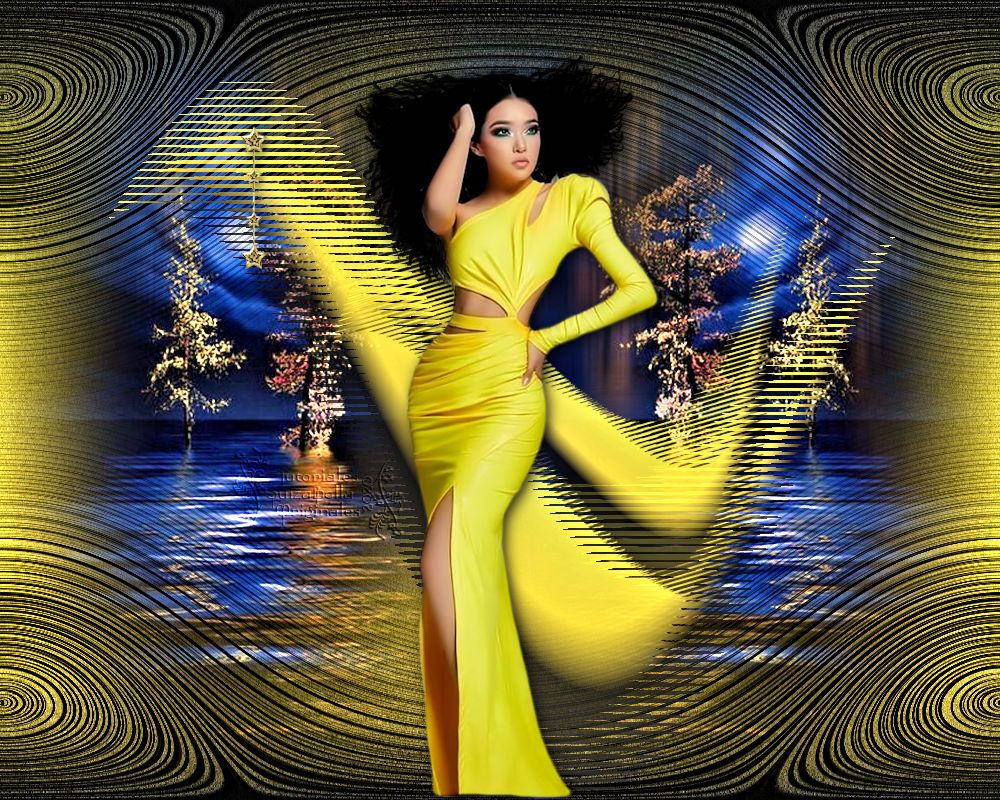
Mon
cygne jaune
Muchas Gracias Pinuccia por tu excelente trabajo.
Muchas Gracias Hiltrud por tu excelente trabajo.
Muchas Gracias Neusa por tu excelente trabajo.
Para imprimir esta página Tutorial Realizado en Corel Paintshop Pro 2020 Gracias por enviar sus Variantes....!!!
SuizaBella_Ref_AG-001887 SuizaBella_Ref_AG-001093.pspimage seleccionsuizatutoCisne.PspSelection Tube DecoCisne.png
Nick Software / Color Efect Pro 3.0 Complementos /Alien Skin / Eye Candy 5 Impact / Perspective Shadow Efectos del Programa
Gracias por la Excelencia del Material
Comenzamos..!
1.- Primer Plano #e1db2d / Fondo #121212
2.-Creamos un Gradiente Lineal ( SuiGrad041) Adjunto en el material mi gradiente
3.-Abrimos nueva imagen / 1000 x 800 y pintamos..!! 4.-Ajustes / Añadir o quitar ruido
5.-Efectos de Imagen / Mosaico Integrado
6.-Copiar y pegar como nueva capa / Tube DecoCisne.png 7.-Capas / Nueva capa de trama 8.-Selecciones 9.-Cargar Seleccion de Disco / seleccionsuizatutoCisne.PspSelection
10.-Pintamos la selección con nuestro gradiente, y bajamos la opacidad al 81% 11.-Selecciones / Modificar Bordes de Selección
12.-Esta selección / igualmente la pintamos con nuestro gradiente 13.-Efectos 3D / Biselado Interior / Luz Color #ffffff
Anulamos selección.. 14.-Efectos de Distorsión / Ondas /
15.-Dúplicamos y cambiamos de tamaño al 60%... y nos quedara como muestro en captura...!
Herramienta mover / Bajamos un poco,como se muestro en captura...!
Herramienta mover / Giramos un poco como se aprecia en captura..!
16.-De esta manera quedara como el modelo..! 17.-Fusionamos hacia abajo. 18.-Bajamos a Trama 1 19.-Copiar y pegar como nueva capa / Tube Piasaje (Compuesto ) ( SuizaBella_Ref_AG-001093.pspimage ) 20.-Ajustar / Desenfoque de Movimiento ( 2 veces )
21.-Seguimos en esa misma capa .. 22.-Copiar y pegar como nueva capa / Tube Piasaje / SuizaBella_Ref_AG-001093.pspimage 23.-Efectos de Imagen / Desplazamiento / Horizontal -259 / Vertical -38
24.-Capas / Dúplicar 25.-Imagen / Espejo 26.-Fusionamos Visibles... 27.-Complementos / Nick Software / Color Efect Pro 3.0 / Darken / Lighten Center / + 68% / + 89% / 50 %
28.-Ajustar / Brillo y Contraste / Luz De Relleno y Claridad
29.-Copiar y pegar como nueca capa / Tube SuizaBella_Ref_AG-001887 30.-Cambiamos al 75% 31.-Objetos / alinear hasta abajo 32.-Complementos /Alien Skin / Eye Candy 5 Impact / Perspective Shadow Shadow Color #000000
Fusionamos todo 33.-Copiamos y pegamos como nueva capa / Tube Deco Cisne 25.. (Estrellitas ) como pueden ver en el modelo..! Fusionamos todo....!!!! Hasta aquí nuestro Tutorial....! Se Agradece.... Poner el crédito correspondiente a la Autora del Tutorial (Tutorial ©SuizaBella) Poner el crédito correspondiente a la Tráductora del Tutorial Tus Créditos . Fusionamos todo y guardamos en JPGE
Gracias por enviar sus Variantes....!!!
Esta Creación es de mi Absoluta Autoria ©SuizaBella
Cualquier similitud con otro Tutorial,...es solo coincidencia. El material de mis Tutoriales,llegan a mi correo por lista de distribución,o por que he solicitado el permiso correspondiente, y si algún tube o imágen no debe estar aquí,por favor comunicarme y será retirado de inmediato.
(Resolusión de Pantalla Sugerida 1920 x 1080 )
© Creaciones SuizaBella 2020 |


.jpg)